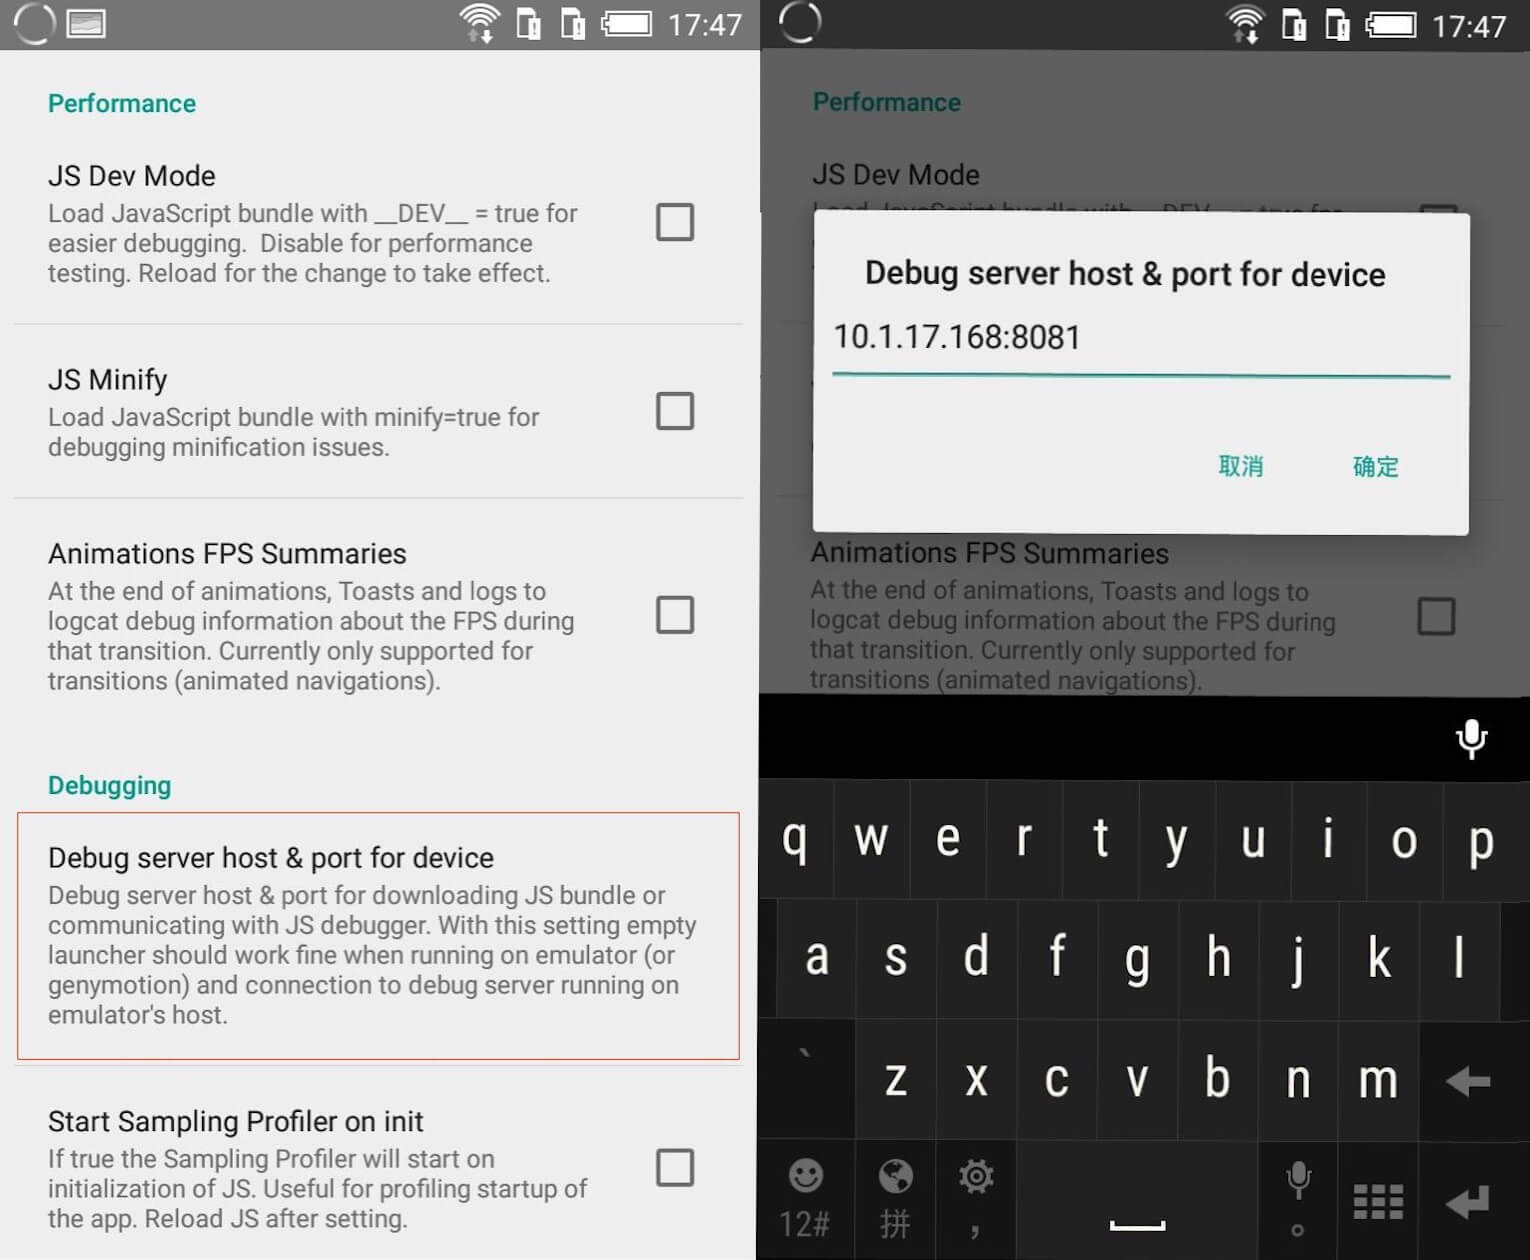
前言 ReactNative 在 android 上开发时摇一摇选择 Debug server host & port for device 即可 让真机访问指定 ip 及 端口上的 js bundle 文件,如下图:
但是 iOS 默认没有这个功能,初始化一个项目后(截止本文,最新版本为 0.48.0),默认使用的是 localhost:8081,所以真机调试要么设置代理,要么手动更改 AppDelegate.m 里代码(这样每次改完都得重新编译一遍)。
下面我们将一步一步找出方法来给 iOS 的摇一摇增加一个跟 android 一样的菜单项来修改 ip 及端口。
PS: 本文使用的 ReactNative 版本为 0.48.0
乱入 (题外话)查看源码过程中,发现重写 XMLHttpRequest 的一些方法就可以拿到请求和响应内容,后面有时间的话,可以写个库保存下来,这样当需要时就可以收集用户请求及响应的内容,可以用在调试时查看,或是当用户数据有问题时搜集一下进行对比调试。
代码大概如下:
1
2
3
4
5
6
7
8
9
10
11
12
13
14
15
16
17
18
19
20
21
22
23
24
25
26
27
28
29
30
31
32
33
34
35
36
function hook () { const XMLHttpRequest = require('XMLHttpRequest') const originalXHROpen = XMLHttpRequest.prototype.open const originalXHRSend = XMLHttpRequest.prototype.send const originalXHRSetRequestHeader = XMLHttpRequest.prototype.setRequestHeader XMLHttpRequest.prototype.open = function (method, url) { // get the request data and save them here originalXHROpen.apply(this, arguments) } XMLHttpRequest.prototype.setRequestHeader = function (header, value) { originalXHRSetRequestHeader.apply(this, arguments) } XMLHttpRequest.prototype.send = function (data) { if (this.addEventListener) { this.addEventListener('readystatechange', () => { if (this.readyState === this.HEADERS_RECEIVED) { const contentTypeString = this.getResponseHeader('Content-Type') const contentLengthString = this.getResponseHeader('Content-Length') let responseContentType, responseSize if (contentTypeString) { responseContentType = contentTypeString.split(';')[0] } if (contentLengthString) { responseSize = parseInt(contentLengthString, 10) } } if (this.readyState === this.DONE) { // get the response data and save them here } }, false) } originalXHRSend.apply(this, arguments) } }
分析 JS入口 初始化项目后,可以看到 AppDelegate.m 里的入口为:
1 jsCodeLocation = [[RCTBundleURLProvider sharedSettings] jsBundleURLForBundleRoot:@"index.ios" fallbackResource:nil];
跟踪其内部实现如下(关键地方见下面注释内容):
1
2
3
4
5
6
7
8
9
10
11
12
13
14
15
16
17
18
- (NSURL *)jsBundleURLForBundleRoot:(NSString *)bundleRoot fallbackResource:(NSString *)resourceName { resourceName = resourceName ?: @"main"; // packagerServerHost 在 RCT_DEV=1 下默认为 localhost,否则为 nil NSString *packagerServerHost = [self packagerServerHost]; if (!packagerServerHost) { // 使用打包在本地的 main.jsbundle return [[NSBundle mainBundle] URLForResource:resourceName withExtension:@"jsbundle"]; } else { // 使用 http://localhost:8081/index.ios.bundle?platform=ios&dev=true&minify=false NSString *path = [NSString stringWithFormat:@"/%@.bundle", bundleRoot]; // When we support only iOS 8 and above, use queryItems for a better API. NSString *query = [NSString stringWithFormat:@"platform=ios&dev=%@&minify=%@", [self enableDev] ? @"true" : @"false", [self enableMinification] ? @"true": @"false"]; return [[self class] resourceURLForResourcePath:path packagerHost:packagerServerHost query:query]; } }
从以上可以看到如果 RCT_DEV 为 1 时默认使用 http://localhost:8081/index.ios.bundle?platform=ios&dev=true&minify=false,否则使用打包在本地的 main.jsbundle 文件。
那么我们就可以像这样在 Debug 模式(或 RCT_DEV=1 )下使用自己定义的地址:
1
2
3
4
5
#ifdef DEBUG jsCodeLocation = [NSURL URLWithString:@"http://localhost:8081/index.ios.bundle?platform=ios&dev=true&minify=false"]; #else jsCodeLocation = [[RCTBundleURLProvider sharedSettings] jsBundleURLForBundleRoot:@"index.ios" fallbackResource:nil]; #endif
所以我们只要做个功能将自定义的地址保存在本地,然后在初始化 jsCodeLocation 时替换 localhost:8081 这一部分即可。至于保存的策略有多种,因为这里是在 js 加载前的,所以像 android 那样摇一摇菜单里有个选项来填个人认为是比较不错的方案。所以接下来的问题是如何在 iOS 上给摇一摇增加选项。
PS: 查看源码过程中,发现在工程里放一个 ip.txt 填入 ip 地址,会自动读取里面的 ip 来代替默认的 localhost
摇一摇菜单 首先我们先找到摇一摇菜单的相关源码,看其是怎样实现的。
这里在工程里搜索 ActionSheet 的标题关键字 React Native: Development 即可找到相关源码是在 RCTDevMenu 这个类里面,看其头文件,可以找到这个关键的 api:
1
2
3
4
5
/** * Add custom item to the development menu. The handler will be called * when user selects the item. */ - (void)addItem:(RCTDevMenuItem *)item;
所以只要找到 RCTDevMenu 的实例即可,继续查找源码,发现 RCTDevMenu.h 里还有个 Category:
1
2
3
4
5
@interface RCTBridge (RCTDevMenu) @property (nonatomic, readonly) RCTDevMenu *devMenu; @end
所以只要取到 RCTBridge 的实例即可。
RCTBridge ReactNative 的内容关键是在入口这段代码:
1
2
3
4
RCTRootView *rootView = [[RCTRootView alloc] initWithBundleURL:jsCodeLocation moduleName:@"SCRNDemo" initialProperties:nil launchOptions:launchOptions];
查看 RCTRootView.h 里就有这个 bridge 实例了:
1
2
3
4
5
/** * The bridge used by the root view. Bridges can be shared between multiple * root views, so you can use this property to initialize another RCTRootView. */ @property (nonatomic, strong, readonly) RCTBridge *bridge;
所以只要取到 AppDelegate.m 里的 RCTRootView 就能找到 RCTBridge 了:
1
2
3
4
5
6
7
8
+ (RCTBridge*)getRootBrdige { AppDelegate *appDelegate = (AppDelegate*)([UIApplication sharedApplication].delegate); RCTRootView *rootView = (RCTRootView*)appDelegate.window.rootViewController.view; if (![rootView isKindOfClass:[RCTRootView class]]) { return nil; } return rootView.bridge; }
(以下这段是题外话)带着好奇心,查看刚才初始化的内部源码,会先创建一个 RCTBridge 对象,这个是原生代码跟 JS 交互的桥梁,是很关键的一个东西。
继续跟踪里面代码,其中 setup 方法主要是创建了一个 RCTCxxBridge 对象,里面还有个 RCTBatchedBridge,这个看注释说以后会移除:
1
2
3
4
// In order to facilitate switching between bridges with only build // file changes, this uses reflection to check which bridges are // available. This is a short-term hack until RCTBatchedBridge is // removed.
然后最关键的是该对象的 start 方法,里面主要做了这几件事:
创建一条 JS 线程
初始化原生模块(包括我们使用 RCT_EXPORT_MODULE 创建的原生模块)
初始化 JS 代码的执行器(JSExecutorFactory)
初始化模块列表并派发给 JS 端
执行 JS 代码
RCTBridgeModule 按以上的分析,我们在入口处就可以添加一个菜单项了,但是当摇一摇 Reload 后,会发现我们添加的那一项又不见了。
在 RCTDevMenu.m 里可以看到 reload 方法是调用 [_bridge reload] 这个方法的,而这个方法最终会重新执行上一小节所说的 RCTCxxBridge 的 start 方法,上面也说过了,这个 start 方法会初始化原生模块。
所以我们可以写一个 原生模块 ,在这个原生模块里去添加菜单项。
我们新建文件 SCDebugBridge:
1
2
3
4
5
6
7
8
9
10
11
12
13
14
15
16
17
18
19
20
21
22
23
24
25
26
27
RCT_EXPORT_MODULE(SCDebug) #ifdef DEBUG - (instancetype)init { if (self = [super init]) { [self addIpAndPortDevItem]; } return self; } - (void)addIpAndPortDevItem { dispatch_async(dispatch_get_main_queue(), ^{ RCTBridge *bridge = [SCDebugBridge getRootBrdige]; if (!bridge) { return; } NSDictionary *ipAndPort = [SCDebugBridge getIpAndPort]; RCTDevMenuItem *item = [RCTDevMenuItem buttonItemWithTitleBlock:^NSString *{ return [NSString stringWithFormat:@"Debug Server Host & Port (%@)", ipAndPort[@"from"]]; } handler:^{ // show textFields to input ip and port }]; [bridge.devMenu addItem:item]; }); } #endif
接下来我们再写个方法读取存储好的 ip 和 port 在 AppDelegate.m 入口处使用即可:
1
2
3
4
5
6
7
8
9
10
11
12
13
14
15
+ (NSDictionary*)getIpAndPort { NSString *ip = @"127.0.0.1"; NSString *port = @"8081"; NSString *from = @"default"; NSString *str = [[NSUserDefaults standardUserDefaults] objectForKey:SC_DEBUG_IP_PORT]; if (![SCDebugBridge isEmptyString:str]) { // from userDefault (dev menu) NSArray *tmpArr = [str componentsSeparatedByString:@":"]; ip = tmpArr.count > 0 ? tmpArr[0] : @"127.0.0.1"; port = tmpArr.count > 1 ? tmpArr[1] : @"8081"; from = @"menu"; } return @{@"ip": ip, @"port": port, @"from": from}; }
Reload 接下来还有一个问题,就是输入新的 ip 和 端口后,如何重新加载 JS。
刚开始是比较粗暴地使用 exit(1); 来退出,后来觉得太过粗暴了,就改为重新初始化一个 RCTRootView,重新赋值给 window.rootViewController.view,不过想想还是有点粗暴,就去查看源码,发现有个分类:
原本 RCTBridge.h 的 bundleURL 是 readonly 的,不过 RN 在 RCTBridge+Private.h 这里面的 bundleURL 是 readwrite 的,所以就很简单了:
1
2
3
4
5
6
7
8
9
10
#import <React/RCTBridge+Private.h> + (void)reloadApp { NSDictionary *ipAndPort = [SCDebugBridge getIpAndPort]; NSURL *jsCodeLocation = [NSURL URLWithString:[NSString stringWithFormat:@"http://%@:%@/index.ios.bundle?platform=ios&dev=true&minify=false", ipAndPort[@"ip"], ipAndPort[@"port"]]]; RCTBridge *bridge = [SCDebugBridge getRootBrdige]; bridge.bundleURL = jsCodeLocation; [bridge reload]; }
总结 完整代码放在 https://github.com/Aevit/SCRNDemo 里,主要代码查看 SCDebugBridge.m 即可,然后在 AppDelegate.m 入口处使用:
1
2
3
4
5
6
7
8
#import "SCDebugBridge.h" #ifdef DEBUG NSDictionary *ipAndPort = [SCDebugBridge getIpAndPort]; jsCodeLocation = [NSURL URLWithString:[NSString stringWithFormat:@"http://%@:%@/index.ios.bundle?platform=ios&dev=true&minify=false", ipAndPort[@"ip"], ipAndPort[@"port"]]]; #else jsCodeLocation = [[RCTBundleURLProvider sharedSettings] jsBundleURLForBundleRoot:@"index.ios" fallbackResource:nil]; #endif
通过这次也了解到了 ReactNative 的入口逻辑,后面的其它源码等有时间再来好好看一下。
2017-10-12 00:50
摄影:Aevit 2013年4月 丽江

